Home Blog

The Role of An Audio Mixer: An Introduction

An audio mixer, also known as a mixing console, is an essential electronic device for achieving optimal sound quality in various audio productions, including music, podcasts, and live events. It plays a vital role in the seamless integration and balance of different audio signals from sources like microphones, instruments, and pre-recorded audio.

The primary function of an audio mixer is to adjust and combine these audio signals to create a harmonious blend. By fine-tuning the sound levels and applying various processing techniques, the mixer enhances the overall sound quality, ensuring a seamless listening experience for the audience.

It allows you to control the individual inputs, adjust the audio levels and processing, and route the mixed signals to multiple outputs, such as sound systems, speakers, or recording devices, according to your specific production needs.

Let’s explore audio mixers and discover how they are used in live sound.


Accept Multiple Inputs

Accept Multiple Inputs

An audio mixer is designed to accept multiple inputs from various audio sources, including microphones, instruments, and synthesizers. This versatile capability allows for the simultaneous connection and control of multiple audio sources in either a live or recording situation. It can combine the various input signals into a single output signal.


Adjust the Inputs Level & Processing

Adjust the Inputs Level & Processing

Input signals can come from equipment like microphones, instruments, music players or synthesizers. Not every input signal is the same. Some are very soft (low level) while other maybe very loud or “hot” (high level). Left on their own, the loud signals will naturally overwhelm or crowd out the softer signals.

An audio mixer has the capability to adjust the input levels for each audio source. This allows the incoming sounds to be taken into the mixer at a more uniform level. Then it would then be possible for the sound operator to determine which ones to make louder or softer in the final mix.

By adjusting the input levels, you can prevent distortion and achieve the desired volume for each source.

In addition to input level control, an audio mixer offers various processing features to enhance the audio signals. One of the essential tools is the EQ (equalization), which allows you to adjust the tonal balance of individual audio sources. With EQ knobs or sliders, you can boost or cut specific frequencies, shaping the sound to fit your preferences. This enables you to emphasize certain elements and create a more pleasing and cohesive mix.

Moreover, audio mixers enable you to apply effects to the audio signals, such as reverb or delay. Effects can significantly enhance the overall sound quality and add depth and character to your audio productions. By using the mixer’s built-in effects or connecting external effects units, you can experiment with different spatial effects, time-based effects, or modulation effects.


Send to Multiple Outputs

Send to Multiple Outputs

An audio mixer also allows you to send the mixed audio signals to multiple outputs, offering flexibility in routing the sound according to your specific needs.

This feature is particularly valuable for various audio situations including live events and music recording.

By utilizing the multiple outputs of an audio mixer, you can easily send the mixed audio to different destinations simultaneously. For instance, you can connect the mixer to a sound system to amplify the audio for a live audience, while also sending the signals to speakers for on-stage monitoring. Or, if you’re recording the audio, the mixer can send the mixed signals directly to a recording device, ensuring high-quality and accurate capture of the sound.


Buses Let Signals Move Around the Mixer

Buses Let Signals Move Around the Mixer

So how does the signal move around the mixer and travel from the inputs to the outputs? That’s where the buses come in.

Just like how cables are used to transmit electrical signals from equipment to equipment in a sound system, buses perform the same role but within the confines of a mixer. They are the “roads” that electrical signals use to move around inside a mixer.

You may hear about different types of buses in a mixer but they all do the same time – move sound from one part of mixer to another.

For example, you may hear about the stereo output buses. This is the route where the signals are sent out of the mixer’s main stereo out.

Another type of mixer bus is the auxiliary bus. Auxiliary buses are used for sending audio signals out of the auxiliary outputs to effects processors or for monitoring purposes. They provide a way to apply effects to specific audio signals without affecting the overall mix.


Key Takeaways: Purpose of a Mixer

  • A mixer is able to accept and combine multiple input sources
  • It has the ability to adjust the input sources to acceptable levels
  • The signals can be sent to multiple outputs
  • Within the mixer, buses are the “roads” that signals use to get around

Audio Cables: How Signals Flow Through the Sound System

We will be looking at the humble audio cables and how they contribute to the seamless transmission of signals within a sound system. From connecting instruments to amplifiers and speakers, audio cables play a vital role in ensuring high-quality sound.

In this article, we will explore the different types of audio cables, their functions, and why they are essential for creating an immersive audio experience.


Unbalanced versus Balanced Cables

While cables may look similar from the outside, take a look inside and you will discover that there are differences underneath the outer cladding of the cable.

When working in live audio, you will be mainly working with analog cables that carry electrical signals. This is as opposed to digital cables that carry digital information in the form of 1s and 0s.

A cable is made up of a core and a shield. The core wire carries the signal while the shield helps to prevent noise from entering into the core. It also acts as the ground wire and the return path for the signal.

The two main types of cables that you will commonly encounter when working in audio: unbalanced and balanced cables.


What are Unbalanced Cables

What are Unbalanced Cables

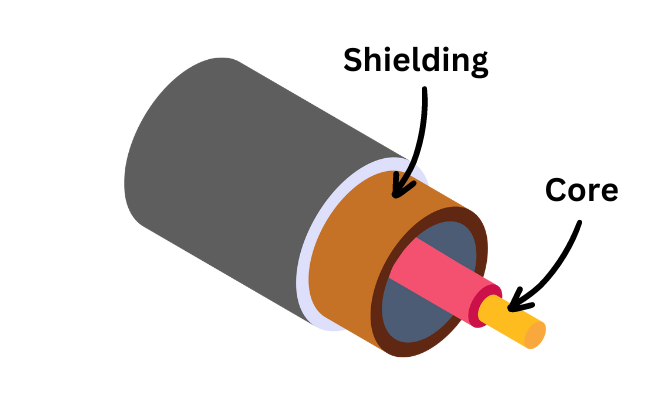
Unbalanced cables are a type of cable that carry audio signals using only two wires: a conductor wire and a ground shielding.

These cables are commonly used for shorter cable runs and in applications such as connecting guitars to amplifiers or consumer audio devices.

Unbalanced cables are more affordable and suited for simpler audio setups. However, they are also more susceptible to noise interference and can degrade signal quality over longer distances. This means that if you’re using unbalanced cables for a large sound system or an audio setup with significant cable lengths, you may experience more noise and a less clear audio signal.


What are Balanced Cables

Balanced Cables

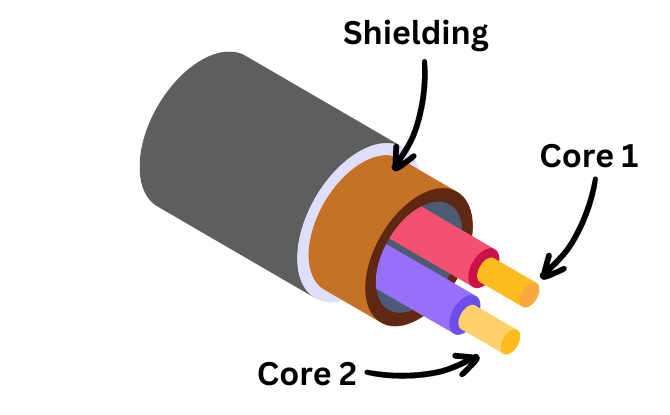
Balanced cables are designed with a ground wire and two conductor wires, allowing them to cancel out any noise or interference that may be picked up during signal transmission. This ensures that the audio signal remains balanced and free from unwanted noise, resulting in optimal audio quality.

Unlike unbalanced cables, which use only two wires, balanced cables utilize an additional wire to achieve noise cancellation. The ground wire serves as the reference point for the audio signal, while the two conductor wires carry the audio information.

Common Mode Rejection

Common Mode Rejection

This balanced configuration helps to eliminate common-mode noise, which can be caused by external factors such as electromagnetic interference (EMI) or ground loops.

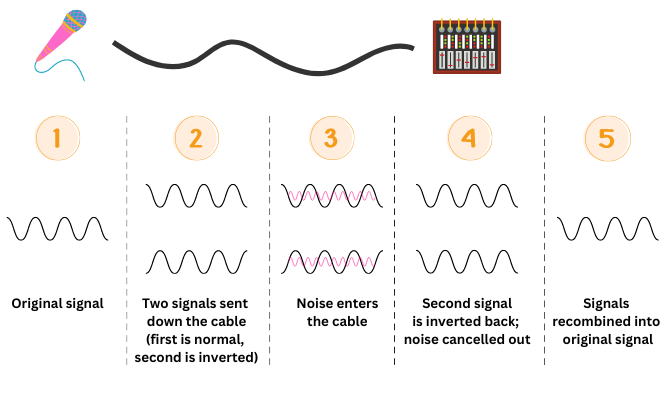
The process of noise cancellation in balanced cables involves the use of polarity inversion. As the audio signal travels through the cable, it passes through one conductor wire with the normal polarity (think of polarity as a direction) and the other conductor wire with the inverted polarity (i.e. an inverted direction).

When the signal reaches the destination device, the inverted polarity is reversed back to its original polarity, effectively cancelling out any noise that may have been picked up along the way.

This mechanism significantly reduces the chances of noise interference and ensures a clean and clear audio signal.

One of the main advantages of balanced cables, thanks to their noise cancellation capabilities, is that they can be used over longer cable runs without sacrificing audio quality.

This makes them ideal for connecting audio equipment that is far apart, such as microphones to mixers or stage monitors to amplifiers. Additionally, balanced cables are also beneficial in environments where there may be a lot of electrical noise or interference, such as in live concert venues or recording studios.


Pros & Cons of Unbalanced versus Balanced Cables

When it comes to audio cables, you have two primary options: unbalanced cables and balanced cables. Each type has its own set of advantages and disadvantages, and understanding their pros and cons is crucial in determining which option is best for your audio needs.

Unbalanced Cables:

Unbalanced cables are the simpler and more cost-effective choice. They consist of two wires: a ground wire and a conductor wire. These cables are commonly used for shorter cable runs and in applications such as connecting guitars to amplifiers or consumer audio devices.

One of the main drawbacks of unbalanced cables is their susceptibility to noise interference. As the signal travels through the cable, it can pick up electrical noise, leading to a decrease in signal quality. This noise interference becomes more prominent over longer distances, impacting the overall audio experience.

Balanced Cables:

On the other hand, balanced cables provide superior noise cancellation and are ideal for longer cable runs. These cables utilize an additional wire known as the ground or shield wire. This wire is dedicated to canceling out any noise or interference picked up during signal transmission, ensuring a clean and uninterrupted audio signal.

While balanced cables offer excellent noise cancellation, they do come with some downsides. Compared to unbalanced cables, balanced cables can be more expensive. Additionally, using balanced cables requires equipment that supports balanced connections, adding to the overall cost of the audio setup.

Choosing the Right Cable:

When deciding between unbalanced and balanced cables, it’s crucial to consider your specific audio needs. If you’re working with shorter cable runs and cost-effectiveness is a priority, unbalanced cables may be the right choice for you. However, if you’re looking for superior noise cancellation and are working with longer cable runs, investing in balanced cables is the way to go.


Categorising Cables by their Connectors

At the end of cables, you will find connectors. These are connectors allow cables to be connected to equipment through input jacks located on the equipment. This allows the signal to flow out from the cables and into the equipment.

There are multiple types of connectors. Some of them are designed to work with unbalanced cables while others are used with balanced cables.

It is common to refer to cables by the type of connectors.


TS Cables

TS Cables

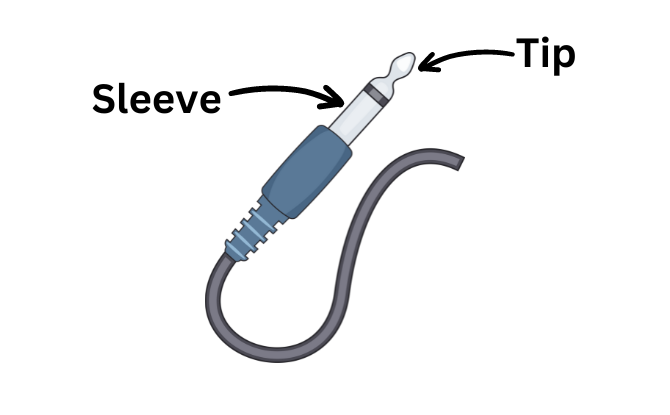
TS cables, also known as Tip/Sleeve cables, are a type of unbalanced cable that are commonly used for connecting mono sources in audio setups. Mono sources include instruments like guitars and bass, as well as effects and audio interfaces.

The Tip is connected to the core and carries the live signal. The Sleeve is connected to the shielding and acts as the return or ground path.

TS cables are typically available in 1/4″ sizes, although smaller variations like 1/8″ or 3.5mm are also available for consumer products. These cables are widely used for their simplicity and affordability, making them a popular choice.

When using TS cables, it’s important to keep the cable length as short as possible to minimize the risk of signal noise. This is especially crucial for maintaining the audio quality when connecting mono sources. By keeping the TS cables short, you can ensure a cleaner and more reliable signal transfer.


TRS Cables

TRS Cables

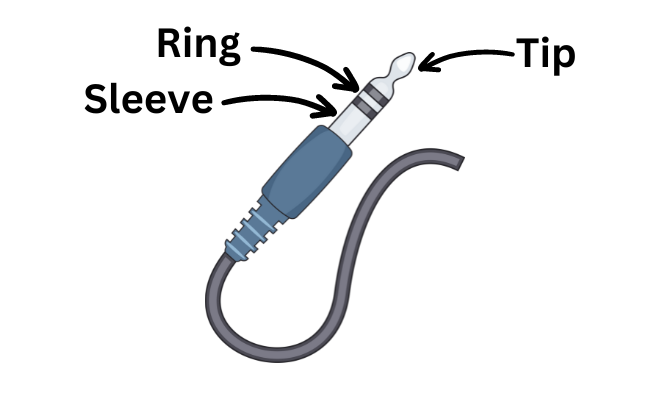
TRS cables, or Tip/Ring/Sleeve cables, are an essential tool in audio setups that require balanced connections. These cables have three contact points that allow them to be used with balanced cables. The Tip is connected to the first core, the Ring is connected to the second core and the Sleeve is connected to the shielding.

They can also be used to carry stereo audio signals (left channel, right channel and the ground).

Mixers often use TRS cables to connect auxiliary send and return channels for integrating external effects processors.

Another common application of TRS cables is in headphones. Many high-quality headphones utilize TRS connectors to ensure balanced audio delivery to each earcup, resulting in a more immersive and accurate listening experience.


XLR Cables

XLR Cables

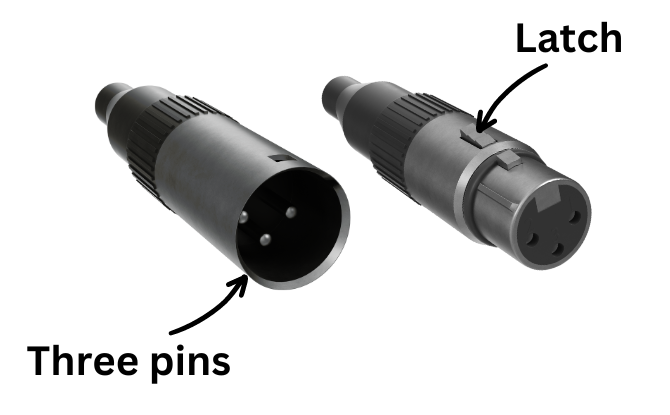
XLR cables are an integral component of professional audio setups due to their reliability and ability to deliver clean and balanced connections. The XLR connector has three pins that allow for connections to the ground wire and two conductor wires specifically designed for carrying the audio signal. The female end of an XLR connector incorporates a latch that is used keep the cables securely fasten.

The XLR cable is most commonly used with microphones. This results in them often being referred to as microphone cables.

One of the notable advantages of XLR cables is their capability to maintain a clean and high-quality signal, even over extended cable runs. This makes them particularly suitable for large-scale events or venues where a consistent audio signal is crucial. Moreover, XLR cables are known for their durability and resilience, ensuring reliable performance in demanding professional audio applications.


Speaker Cables and Speakon Connectors

Speaker Cables and Speakon Connectors

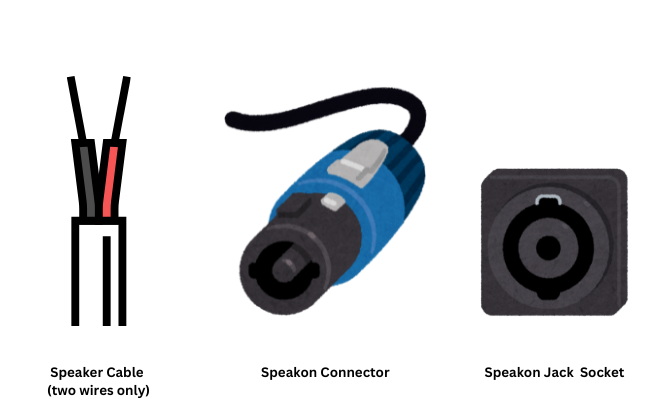
Speaker cables are designed specifically for connecting amplifiers to speakers. These cables serve the crucial role of delivering high voltage audio signals from the amplifier to the speakers with optimal efficiency and power transfer.

One common type of connector used in speaker cables is the Speakon connector. This particular connector offers a secure and locking connection, ensuring that there are no accidental disconnections during live performances or in high-demand audio environments.

It has a built-in latch and is secured into the Speakon jack by inserting and twisting to the right until the latch engages. To remove it from the jack, pull back on the latch and twist to the left and then pull ou.

Another type of connector used with speaker cables is the TS connector. This makes a speaker cable with TS connector look very similar to instrument cables. However, speaker cables will typically have a larger gauge of wire to handle the higher voltage.


RCA Cables

RCA Cables

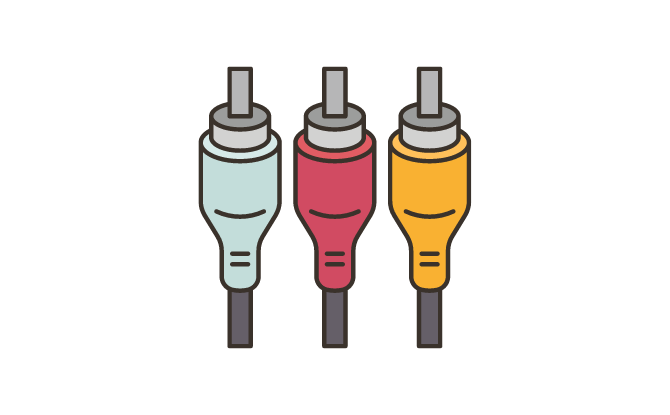
RCA cables are a popular choice for connecting audio devices in consumer audio setups and DJ systems. The RCA connector is connected to unbalanced TS cables. They are known for their distinctive red and white color-coded connectors, making them easy to identify and connect. You may also come across RCA connectors with a third yellow color connector. This is used to carry a video signal in appliances such as DVD players. Whether you’re setting up a home entertainment system or working as a DJ, RCA cables are a versatile option for transmitting audio signals.

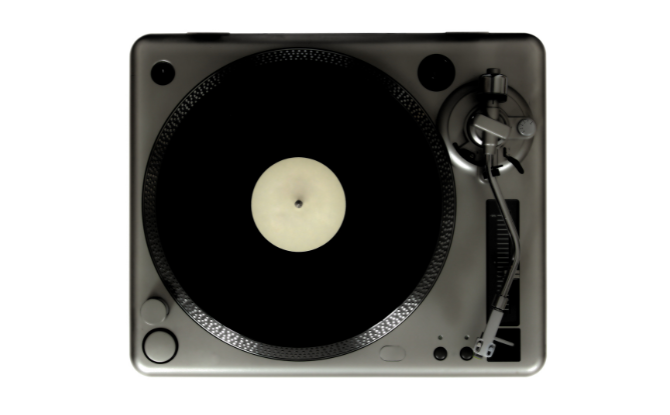
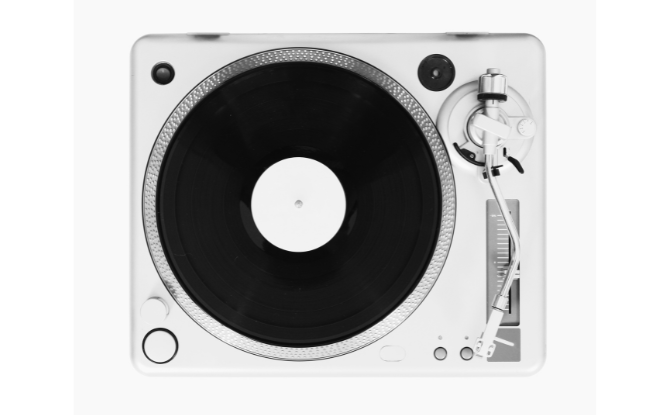
One common use for RCA cables is connecting mixers, turntables, and CD players to mixers. With their RCA connectors, these cables enable you to seamlessly transmit audio between different audio devices. They are widely compatible and can be easily inserted into RCA jacks found on a variety of devices.


Key Takeaways

  • Audio cables are crucial for transmitting signals within a sound system and ensuring accurate and efficient audio information transfer.
  • Unbalanced cables are commonly used for shorter cable runs such as connecting guitars to amplifiers, while balanced cables provide superior noise cancellation and are ideal for professional audio settings.
  • TS cables are used for mono sources such as guitars, while TRS cables are versatile and can be used for applications such as balanced cables or stereo connections.
  • XLR cables are widely used in professional audio setups for their durability and ability to provide a clean and balanced signal transmission. They are also often referred to as microphone cables.
  • Speaker cables are designed for connecting amplifiers to speakers in professional sound systems, ensuring efficient power transfer and secure connections. Speakon connectors are often used with speaker cables.
  • RCA cables are popular in consumer audio setups and DJ systems and are commonly used to connect mixers, turntables, and CD players to mixers.

Overview of a Sound System: A Means to Good Sound

A sound system is key for great live sound that grabs the audience. For concerts, conferences, or theater, the sound system is crucial. It makes sure every word and sound is clear to the listeners.

A properly installed sound system is a means to achieving good sound. In the hands of a proficient sound operator, it is a tool that can be used to connect the stage to the audience.

We’ll explore what sound systems are, what they do, and how they work.


What is a Sound System?

A sound system is made up of set of equipment that works together to make audio louder and clearer.

It is an electrical system that has has components like microphones that capture. It also has mixers and signal processors that mix and tweak sounds, and amplifiers to make them louder before they are sent out again through loudspeakers.

You will find sound systems everywhere like at live events, theaters and other venues. It is a tool for communication. At a concert, it helps every note touch the audience’s heart. At a conference, it ensures voices are heard. This makes the experience much better for everyone.

A great sound setup can make listeners feel different emotions. It helps the audience connect with what’s happening on stage.


Purpose of Sound System

Purpose of Sound System

At the simplest level, the sound system’s job is to take sound waves, turn them into electrical signals, and change them as needed. Then, it turns them back into sound waves for us to hear.

As part of the process of making the sound louder, the signals can also be “edited” for better sound quality. It helps create a better listening experience for the audience.


Three Parts of a Sound System

Three Parts of a Sound System

A sound system has three main parts of stages: input, mixing and processing, and output. Each of these parts is key for great sound.

The input stage catches sound. It does this using equipment like microphones. Mics turn sound waves into signals. Another way that sound can enter into the sound system is music players. These input sound as electrical signals directly into the sound system.

In the mixing and processing stage, we adjust sounds from different sources. This makes the sound mix good and balanced. We use mixers and signal processors to change and better the sounds. Mixers help with volume and tone controls. Signal processors add cool effects and make the sound clearer.

The last part is the output stage. This is where sound reaches listeners through speakers. Amplifiers make the signals strong enough for the speakers. Then, speakers turn signals into sound that we can hear.

The sound system’s three steps, from input to mixing, and then to output, all work together. They help make sound experiences that draw in and keep the attention of listeners.


Input Stage of the Sound System

Input Stage: A Closer Look

The input stage of a sound system captures sound through devices. Microphones are transducers – that means they change energy from one form to another. In this case, they change sound waves (mechanical energy) into electrical signals.

There are many types of microphones. One of the most commonly used one is a dynamic microphone.

Dynamic microphones have a diaphragm that moves to sound waves. This diaphragm is linked to a coil that moves in a magnet field. This creates electrical signals of the sound. These signals then go to the next steps in the system.

Other equipment like electric guitars and keyboards already produce an electrical signal on their own. To input these in musical instruments into the sound system, we can use equipment known as a direct boxes, or DI boxes. These allow musical instruments to work well with the system.


Mixing and Processing Stage of a Sound System

Mixing and Processing

The mixing and processing stage is key to a great sound mix. It is here that the raw audio signals are combined and adjusted for the audience.

Mixers are at the core of this stage. They let audio engineers control the sound of different signals. Audio engineers also use the mixers to create a balanced sound mix.

Mixers have onboard processors suchas basic equalizers that can be used for fine-tuning audio signals. This helps make sure all instruments and vocals are clear. Signal processors such as reverb units can also help to improve sound quality and add effects.

For more advanced sound work, outboard signal processors are used. They provide more options for tweaking the sound. With these, engineers can get the exact sound they want.


Output Stage of a Sound System

Output

The sound system’s final stage is the output stage. It is here that electrical signals are converted into acoustical sound for the audience’s ears.

This stage is made up of amplifiers and loudspeakers. Amplifiers boost the electrical signals’ from the mixers. This gives the signal from the mixer enough power to drive the loudspeakers and push the air to create sound waves.

Amplifiers make the music loud. They take mixed signals and make them stronger. This is so they can power the speakers. Amplifiers handle more voltage and current. They make sure the sound is good and powerful.

Loudspeakers turn the electric signals back into sound. They are built with a cone that can move back and forth in a magnetic field. The motion creates sound waves.


Key Takeaways: Three Stages of a Sound System

  • A sound system is the foundation for achieving high-quality live sound in various events and performances.
  • The purpose of a sound system is to enhance audio quality, reinforce sound, and create a memorable audience experience.
  • A sound system consists of three stages: input, mixing and processing, and output.
  • The input stage involves capturing sound through microphones, direct boxes and audio players.
  • The mixing and processing stage allows for the adjustment and manipulation of audio signals.
  • The output stage convert electrical signals in sound waves that can be heard by the audience.

What is Good Sound & Why Is It Important?

When it comes to enjoying music or audio content, good sound quality is essential for a premium audio experience. Sound quality plays a crucial role in enhancing the overall listening experience, allowing an audience at a live event to fully immerse ourselves in what is going on.

So, what exactly does good sound quality mean? It refers to the clarity, dynamics, and balance in the reproduction of sound. When we have high-quality sound, we can hear every instrument and vocal with precision, ensuring a rich and engaging audio experience.


Why Sound Quality is Important in Live Sound

In live sound situations, such as concerts or performances, sound quality is crucial for delivering an immersive experience to the audience. Good sound quality in live performances allows listeners to hear every instrument and voice clearly, ensuring a balanced mix.

It helps create a more engaging and memorable experience for the audience at live events. It is crucial to deliver the message of the moment and an immersive experience to the listeners, allowing those who are on stage to be able to connect with the audience.

No matter how well the performers on stage are playing or how impactful the words of the presenter, it will not be able to be translated to the audience with good live sound. That is why sound quality matters.

Professional audio systems with high sound quality are essential for delivering a clear and powerful sound in concert venues and live events. Poor sound quality in live performances can lead to audience dissatisfaction and negative reviews.

To better understand what is good sound quality, it would be instructive to examine what is bad sound.

Why Sound Quality is Important in Live Sound

To help us visualize bad sound, imagine that the original sound source is the image of the turntable above.


Bad Sound Example 1: Muffled Sound

Bad Sound Example 1: Muffled Sound

Muffled sound is a common sound quality issue that occurs when the audio lacks clarity and definition. It can be frustrating to listen to as it makes it difficult to distinguish individual instruments or vocals, resulting in a loss of detail in the audio. This lack of audio clarity can negatively impact the overall listening experience, making the sound dull and unintelligible.

Muffled sound can be caused by various factors, including poor microphone positioning or the use of low-quality speakers. When the microphone is not placed properly, it fails to capture the sound accurately, leading to a muffled effect. Similarly, low-quality speakers may not be able to reproduce the audio frequencies accurately, resulting in a loss of clarity.


Bad Sound Example 2: Boomy Sound

Bad Sound Example 2: Boomy Sound

Boomy sound is a phenomenon that can turn a pleasant listening experience into a frustrating one. It refers to an excessive amount of bass frequencies in the audio, resulting in a muddy and overpowering sound.

Boomy sound often occurs when the listener’s ears are overwhelmed by bass frequencies and it is a strain to hear the details. It can be caused by various factors such as improper speaker placement, room acoustics issues, or an unbalanced mix.

When the bass becomes boomy, it masks the clarity of other audio elements, making the overall sound unbalanced. This results in a lack of definition and detail in the audio, making it difficult to fully enjoy the music or audio content.

Moreover, boomy sound can cause discomfort and fatigue to the listener, especially when it is present for an extended period. It can also lead to potential damage to audio equipment, as excessive bass can exert too much pressure on speakers and amplifiers.

Correcting boomy sound requires addressing the root causes that lead to excessive bass. This can involve adjusting speaker placement to ensure proper bass dispersion, treating the room acoustics to reduce bass reflections, and optimizing the mix to achieve a more balanced audio playback.


Bad Sound Example 3: Thin Sound

Bad Sound Example 3: Thin Sound

Thin sound in audio refers to a lack of depth and richness. This often results from an insufficient amount of low and high frequencies. This audio imbalance can be caused by various factors, including poor microphone selection, inadequate speaker setup, or improper EQ settings.

When sound is thin, it lacks warmth and fullness, making it feel uninteresting and devoid of impact. Vocals and instruments may sound weak and distant, which can lead to a lack of emotional connection with the music. The audio balance is compromised, affecting the overall listening experience.

To correct thin sound, it is necessary to address the underlying issues. This includes selecting appropriate microphones that capture a wider range of frequencies and adjusting the speaker EQ to reintroduce missing frequencies. Achieving a balanced audio reproduction is crucial to restore richness and depth in the sound.


Bad Sound Example 4: Distorted Sound

Bad Sound Example 4: Distorted Sound

Distorted sound is an example of sound reproduction issues that can significantly impact the audio quality. When sound is distorted, it is altered or corrupted from its original form, resulting in an unpleasant and unnatural listening experience. Various factors can contribute to distorted sound, including clipping in the audio signal, overdriven amplifiers, and faulty audio equipment.

Distorted sound is characterized by harshness, excessive noise, and a lack of clarity and detail. The audio may become fatiguing to listen to, and it can significantly degrade the overall sound quality of an audio system. The distortions can be so pronounced that they interfere with the ability to understand speech or enjoy the music.

Resolving distorted sound requires identifying and addressing the specific causes. Proper gain staging, which ensures the audio signal remains within the optimal range, can help prevent clipping and distortion. Additionally, replacing faulty audio equipment and ensuring amplifiers are not pushed beyond their limits can mitigate audio distortion and improve sound reproduction.


Good Sound Example: Clarity, Balance & Dynamics (CBD)

Good sound quality is the hallmark of a truly immersive live audio experience. It encompasses several essential elements that work together to create a captivating and enjoyable sound reproduction.

Clarity

Clarity is a key aspect of good sound quality. It means that each instrument and vocal can be heard with precision and distinction. Whether it’s the twang of a guitar or the delicate timbre of a singer’s voice, clarity brings out the intricate details of the audio, enhancing the overall listening experience.

Balance

Balanced tonality is the final piece of the puzzle in achieving good sound quality. It focuses on balancing the sound reproduction to create a natural and pleasing audio experience. Proper tonality ensures that each frequency range is accurately represented, resulting in a well-rounded and balanced sound.

Dynamics

Dynamics play a crucial role in delivering impactful sound. A system with good dynamic capabilities can accurately reproduce a wide range of volume levels, from the gentlest whispers to the thunderous roar of a live concert. This ability to faithfully replicate the dynamics of the original content ensures that the listener can fully appreciate the full emotional range conveyed in the music or audio.

Good Sound has CBD

What is Good Sound: CBD

Achieving good sound quality requires a combination of high-quality audio equipment, thoughtful acoustic treatment, and the expertise of skilled audio engineers.

By prioritizing clarity, balance and dynamics, the audio engineer can create an immersive sonic experience that allows the audience to fully connect with what is happening on stage.


Key Takeaways: What is Good Sound & Why It Matters

  • Good sound quality is crucial for an immersive audio experience.
  • It enhances the clarity, dynamics, and balance in the sound reproduction.
  • Bad sound quality can lead to issues like muffled sound, boomy sound, thin sound, and distorted sound.
  • Muffled sound lacks clarity and definition, while boomy sound is characterized by excessive bass.
  • Thin sound lacks depth and richness, while distorted sound is altered and unnatural.

Roles & Responsibilities of a Live Sound Operator

A live sound operator plays a crucial role in the production of live events, ensuring that the sound quality is optimal for both the performers and the audience.


Roles & Responsibilities of a Live Sound Operator

A live sound operator plays many different roles making sure that all the aspects that have to do with sound during an event run smoothly. This begins even before anyone else steps into the event venue and extends to when everyone else has left. It is not uncommon to say that the sound team is the first in and last out of a venue.

In a larger team, there may be different aspects of sound operations. This could be because there is more equipment to be managed that is beyond the ability of a single person, or that there are multiple hands that can help out. Nonetheless, even when there are multiple people involved in the different roles, it should who is singularly responsible for each assigned task. This will allow for greater accountability.

Here is a look at the various roles and responsibilities of live sound operations.


1. Maintain Equipment

Responsibilities of a Live Sound Operator: Maintain Equipment

Maintaining the equipment is an essential responsibility of a live sound operator. It ensures that the live sound systems function optimally, providing high-quality sound and minimizing technical issues during live events.

This is a responsibility that takes place before an event and is critical to ensure that the sound team can trust and rely on the equipment during an event.

The live sound operator should regularly check the equipment for any damage or malfunctions. This includes inspecting cables for frayed or loose connections, testing microphones for proper functioning, and checking power sources for any issues.

Proper storage and transportation of the equipment are equally crucial. The live sound operator should ensure that the equipment is stored in a dry and secure location to prevent potential damage. When transporting the equipment, it should be packed and handled carefully to avoid any accidents or impact-related damage.

Regular cleaning is important to prevent the buildup of dirt, dust, and debris that can affect the performance of the equipment. A clean live sound system not only improves sound quality but also extends the lifespan of the equipment.

By performing regular maintenance, cleaning, and checks, the live sound operator can ensure that the equipment is in top condition, providing reliable and high-quality sound for every live event.


2. Work with Production Team to Understand Event Flow

Work with Production Team to Understand Event Flow

Collaboration between live sound operators and the production team is crucial to ensure a seamless event flow. By working closely together, the live sound operator can gain an in-depth understanding of the event’s schedule, any changes in the program, and the specific audio requirements for each act.

Effective communication between the live sound operator and the production team allows for smooth coordination and seamless audio transitions throughout the event. By maintaining an open line of communication, the team can anticipate and prepare for any last-minute changes or adjustments that may arise.

For example, if there is a sudden change in the performance order, the live sound operator needs to be aware of this to make the necessary adjustments to the sound equipment. Similarly, if a particular act has specific audio requirements, such as certain effects or instrument levels, the production team can provide this information to the live sound operator in advance to ensure a high-quality sound experience for both performers and the audience.

By fostering collaboration and understanding with the production team, live sound operators can contribute to the successful execution of the event, creating a memorable and immersive sound experience for everyone involved.


3. Setup of Equipment

Setup of Equipment

Setting up the equipment is a crucial part of a live sound operator’s responsibilities. It involves a series of steps to ensure that everything is properly configured for sound production. Attention to detail and organization are key during this process to guarantee that the live sound system is set up correctly and ready for a seamless performance.

First, live sound operators need to arrange the sound system according to the venue specifications. This includes positioning the speakers strategically for optimal sound coverage throughout the space. Next, they must connect the cables, ensuring that each connection is secure and free from any loose connections or interference.

Positioning the microphones accurately is another vital aspect of the setup process. Live sound operators need to consider the type of microphone and its specific application to position it correctly for capturing the best sound quality. They must also carefully adjust sound levels to find the perfect balance between different audio sources.

It is critical for live sound operators to be familiar with various types of sound equipment and their setup requirements. This knowledge allows them to handle different equipment seamlessly and troubleshoot any issues that may arise during the setup process.

Overall, the setup of equipment requires expertise, technical knowledge, and efficient organization. By meticulously following each step, live sound operators can ensure that all equipment is correctly configured, providing the audience with exceptional sound quality and a memorable live sound experience.


4. Conduct Sound Checks

Conduct Sound Checks

Sound checks are an essential part of live performance preparation, ensuring that the sound quality is optimal for the audience. Live sound operators play a crucial role in conducting these checks, adjusting audio levels, testing equipment, and ensuring a balanced and clear sound. Collaborating with performers, they address specific sound preferences or requirements to tailor the sound experience. These sound checks allow for the identification and resolution of any technical issues before the event begins, resulting in a smooth and high-quality sound experience for the audience.


5. Manage, Mix, and Troubleshoot during Event

Manage, Mix, and Troubleshoot during Event

During live events, live sound operators play a crucial role in the management of audio production. Their expertise ensures that the sound quality remains optimal throughout the event. They continuously monitor the sound levels, making real-time adjustments to ensure balanced and clear audio. By skillfully mixing different audio sources, live sound operators create a cohesive sound experience for the audience.

However, live events are not without technical challenges. When unforeseen issues arise, live sound operators spring into action. They quickly troubleshoot any technical problems that may occur, aiming to minimize disruptions and maintain uninterrupted sound quality. Their ability to troubleshoot effectively and resolve technical issues on the spot is of utmost importance.

Whether it’s adjusting the sound levels, mixing audio sources, or troubleshooting technical glitches, live sound operators work tirelessly to provide a seamless audio experience for the audience. Their skills and expertise in live event management, sound mixing, and troubleshooting ensure that the event is a success from an audio perspective.


6. Post-event Teardown

Once the live event is over, it is the responsibility of the live sound operators to carry out the post-event teardown process. This involves carefully dismantling the equipment and ensuring its safe storage for future use. The teardown process includes disconnecting cables, packing up microphones and other gear, and organizing everything systematically.

Proper equipment storage is essential to maintain the performance and longevity of the live sound equipment. The equipment must be stored in a dry and secure location, protected from dust, moisture, and extreme temperatures. Additionally, it is important to handle the equipment with care during the teardown process to prevent any accidental damage.

Post-event dismantling also provides an opportunity to assess the condition of the equipment and identify any maintenance needs. Live sound operators should inspect the cables, connectors, and other components for any signs of wear or damage. Addressing any issues promptly ensures that the equipment remains in optimal working condition for future events.

In addition to equipment care, the teardown process also involves proper organization. Live sound operators should ensure that all cables are neatly coiled, labeled, and stored in the appropriate containers. Microphones and other gear should be packed securely to prevent any damage during transportation or storage.

By following a systematic teardown process and taking proper care of the equipment, live sound operators contribute to the smooth operation of future events. Their attention to detail and commitment to equipment maintenance ensure that each live event can be executed with the same level of professionalism and high-quality sound production.


7. Keep Updated on Audio Industry Developments

Keep Updated on Audio Industry Developments

Staying informed about the latest developments in the audio industry is essential for live sound operators to excel in their roles. As technology continues to advance, it is important for professionals in the field to keep up with industry trends and embrace the latest innovations. By staying updated, live sound operators can enhance their skills, improve the quality of their work, and provide the best possible sound experience for live events.

One way for live sound operators to stay updated is by keeping an eye on audio industry developments. This involves staying informed about new technologies, such as cutting-edge sound equipment or software, that can enhance the sound production process. By incorporating the latest technology into their work, live sound operators can deliver exceptional audio quality and create a memorable experience for the audience.

Another aspect of staying updated in the audio industry is being aware of industry trends. Understanding the current trends and preferences in sound production allows live sound operators to adapt their techniques accordingly. By staying on top of trends, they can provide unique and engaging sound experiences that resonate with the audience and meet their evolving expectations.

Continuous learning and professional development are key for live sound operators to stay ahead of the game. Attending workshops, seminars, and conferences related to the audio industry provides opportunities to learn from industry experts, gain new insights, and expand their network. Additionally, online resources, forums, and communities dedicated to sound production offer valuable information and discussions on the latest advancements and techniques. Engaging in ongoing learning and professional development ensures that live sound operators are equipped with the knowledge and skills needed to deliver top-notch audio experiences at live events.


Key Takeaways: Roles & Responsibilities of a Live Sound Operator

  • A live sound operator is responsible for maintaining the equipment and ensuring its optimal performance.
  • Collaboration with the production team is essential for understanding the event flow and audio requirements.
  • The setup of sound equipment requires attention to detail and organization.
  • Sound checks are crucial for achieving high-quality sound during live performances.
  • Live sound operators manage, mix, and troubleshoot the audio during the event.

Overview of Audio Engineering Principles

Audio engineering or sound engineering is a combination of art and science. It takes art’s beauty and meshes it up with technology’s precision to create something pleasing and engaging for the audience. To do so requires a solid understanding of sound and audio engineering principles. This field involves more than just tools and software. It’s about making sound that truly speaks to people.

Today, audio engineers must keep up with fast changes. They need to know about new tech and changes in media. This introduction shows the main ideas behind great sound production.


Audio Engineering Principles: Symphony of Skills Necessary for Sound Engineering

Every top audio production, whether it is for live sound or recorded sound, requires key sound engineering skills. These skills are vital for audio excellence. They make audio content shine, whether in a live concert setting or on a listening sound system.

These require understanding of topics that range from audio processing and acoustics to sound mixing and more. They let engineers create captivating sounds. It’s the little details that matter here.

Working in sound isn’t a solo act. It’s about teamwork, talking, and solving problems together. What many don’t realise is how people-oriented sound engineers have to be. They not only have to rely on technical skills and creativity but also people skills to get the best out of the performers they are working with.

There’s also a creative side to this work. Sound work lets us tell stories with sounds. It takes creativity to make sounds that touch people.

Knowing about audio hardware and networks is important. It helps sound engineers share their work. They build audio experiences for all to enjoy.

As technology grows, sound engineers must keep up. They maintain high-quality sound. And they help shape the future of sound in media.


Understand the Technical Tools of the Trade

Understand the Technical Tools of the Trade

Today, being skilled in tech is as important as being creative for audio engineers. It’s crucial to know how to use sound equipment and audio technology. They help sound engineers do great work. The more that audio engineers are able to tap upon advancements in technology well, the more they are able to do good work.

The audio field is always getting new tools and software. This makes it possible to do even cooler stuff with sound.

However, it is not using audio technology for technology’s sake. The purpose of technology is to make sound better and clearer. This mix of good old sounds and new tech can create amazing music. Knowing how to use all this gear is key. It makes the music sound great and helps the audio world grow.


Acoustics and Sound Theory Knowledge

Acoustics and Sound Theory Knowledge

In audio engineering, acoustics and sound theory are very important. They can make or break great sound and also help you to get out of trouble.

Unfortunately, the acoustical settings are often something that is hard to adjust or modify. How a room is designed is what you will often have to work with. However, having knowledge of the basics of acoustics will help you to troubleshoot and understand better what is going on sonically in a given space.


Balance, Contrast, and Emphasis

Balance, Contrast, and Emphasis

Music production is shaped by key principles: balance, contrast, and emphasis. These elements build rich, immersive soundscapes that grab and hold attention. Balance ensures the audio feels whole and harmonious. It deals with how left and right audio channels interact, and their space.

Contrast adds depth and dimension to sound. It uses changing volumes and sharpness to make the music more dramatic. These changes make the music’s journey exciting. They guide listeners through highs and lows of the story told by sounds. Great audio engineers excel in managing contrast.

Emphasis is important for key moments in a song. Skilled engineers know which sound details to spotlight. They plan where each sound sits and its frequency. This makes certain vocals or instruments stand out. Good use of emphasis makes unforgettable music moments.


Creativity in The Art of Audio

Creativity in The Art of Audio

Creating great sound goes beyond knowing tools. It’s about exploring new things. Experts try new materials or capture natural sounds. These adventures lead to unique sounds. These make every project special. They help tell stories and attract listeners.

The right sound can make creative work unforgettable. Audio pros aim to keep getting better. They innovate and really listen. They use sound to move and involve people. The mix of loud and quiet sounds makes an impact. This feeling stays with people even after the sound ends.


Critical Listening is Key

Critical Listening is Key

Critical listening is very important in audio work. It helps sound engineers be great at their jobs.

An engineer needs to understand sound well, like an artist knows colors. This skill helps improve audio quality. Engineers use critical listening to fix tiny sound issues. They work on making voices clear and sounds perfect.

Audio operators who listen critically can fix sound problems that others might not notice. They use critical listening to make sounds as best as possible. This skill helps create clear, deep, and moving sounds. It makes audio quality better, using the smallest sound nuances.

The value of critical listening in sound work is huge. It turns normal sound into something amazing. As technology gets better, so must our listening skills. This ensures every sound detail is perfect and every production is of the highest quality.


Collaboration and Communication

Collaboration and Communication

In sound production, collaboration is like a dance rhythm. It keeps the team in sync. A sound engineer’s job involves more than just working solo. It’s about working together with others – the musicians, the singers and other production people. A production can only be successful when a team is united.

Communication is the melody of this rhythm. It makes sharing technical ideas easy. Clear talks between crew members and creative folks are key. They make complex things simple. This way, everyone understands each other, creating a common language.

The production team has people with many skills. There are mixers and producers, all important. Sound engineers connect everyone. They make hard things easy to understand. This teamwork tackles any problem. Soft skills like these make meeting deadlines easier. They show why the team leads in making good sound.


Adaptability and Problem-Solving

Adaptability and Problem-Solving

In the world of audio engineering, being adaptive and good at solving problems is key. Sound engineers must change and grow as technology and trends do. They face audio challenges with a flexible mindset. This lets them do well as things change.

The audio engineering world is full of new tech. Sound pros need to have a learning mindset to pick up new tech, and learn how to find and fix audio issues. This could be working on a new plugin or making sound better for a venue. These skills are very important.

Being adaptable in audio engineering isn’t just about tech skills. It also matters in handling projects and dealing with clients. Engineers must be familiar with different types of music and what listeners like.


Key Takeaways: Audio Engineering Principles

  • Audio engineering is a convergence of artistic expression and technical expertise.
  • Understanding the principles of audio engineering is key to producing high-fidelity sound.
  • A strong grasp of sound quality is critical for professional audio work.
  • Audio engineering is a blend of creativity with science.
  • Ongoing education in technological advances is essential for contemporary sound engineers.

Different Types of Equalizers For Audio Engineering

0

Equalizers play a crucial role in audio engineering. These pieces of gear, or software in the case of digital mixers, allow audio engineers to make adjustments to specific frequencies in a sound. There are several types of equalizers that serve various purposes in audio production.

What Does an Equalizer Do?

When it comes to equalization, there are three main parameters that every equalizer works with. These are:

  • Frequency
  • Gain
  • Bandwidth or Q

Frequency determines the center frequency that will be adjusted.

Gain is like a mini volume knob. You can choose to boost the gain on a frequency to make it more prominent or cut the gain to make it less prominent.

Bandwidth or Q is a measure of how many of the surrounding frequencies are impacted when you raise or lower the Gain. A low Q setting results in a wide bandwidth. This means that any adjustments affect a large range of frequencies. A high Q setting result in a narrow bandwidth. This allows you to make more precise adjustments on a frequency.

Type of Equalizers

You can understand different types of equalizers based on how much control you have over these three parameters.

Parametric EQ

Parametric EQs provides the most control for audio engineers as they allow for the adjustment of frequency, gain, and bandwidth (Q).

You will often find them in digital mixers.

One of the advantages of a parametric EQ is its ability to adjust the center frequency, allowing for pinpoint control over problem areas or desired elements in a mix. This allows audio engineers to isolate and shape individual instruments or vocals by boosting or cutting specific frequencies.

Additionally, the gain control enables precise volume adjustments, while the Q control determines the width of the affected frequency range, allowing for narrow or broad shaping of the sound.

In the context of mixing, a parametric EQ is invaluable for achieving clarity, separation, and balance among different elements in a mix. By carefully adjusting the frequency bands, an engineer can carve out space for each instrument or vocal, ensuring that they occupy their own sonic territory without clashing or getting lost in the mix.

Semi-Parametric EQ

In a semi-parametric EQ, the Q is fixed. However, you would still be able to adjust the Frequency and the Gain.

This is useful for zooming in to adjust specific frequencies.

Fixed EQ

Fixed EQ

This is the simplest form of an EQ. You will sometimes find it labelled Lows, Mids or Highs. With this sort of Fixed EQ, the Frequency and the Q have already been determined. All that you can control is whether to boost or to cut the Gain.

Graphic EQ

Graphic EQ

This type of EQ uses sliders to control individual frequency bands. A 31-band Graphic EQ will have 31 silders, each controlling a frequency band. It allows for control of the gain, but the Frequency and Q for each of the sliders is fixed.

It has the advantage of letting you “see” or visualise the EQ settings that you are applying.

Graphic EQs are most often used for tuning a room’s acoustics and are an effective tool for removing problem frequencies in live sound engineering. With its intuitive interface, audio engineers can easily identify and attenuate specific frequencies that may cause feedback or muddiness in a venue’s sound system.

It can also often be found as a final EQ for the overall mix coming out from mixer. By manipulating the sliders, engineers can also enhance or attenuate certain frequencies to achieve a desired tonal balance.

Shelving EQ

Shelving equalizers (EQs) allow for adjustments to either the top and bottom range of frequencies. Instead of raising or lowering the frequencies around a notch, the shelving EQ will raise or lower all the frequencies above or below the set frequency.

High Pass Filter

The high pass filter is a special type of EQ that allows frequencies above a certain cutoff point to pass through, helping to remove unwanted low-frequency content in audio productions.

It is commonly used to clean up recordings, improve clarity, and prevent low-frequency rumble or noise from interfering with the overall sound.

When setting the cutoff frequency on a high pass filter, audio engineers typically make adjustments based on the specific requirements of the audio production.

For example, in a music mix, they might choose a higher cutoff point to remove low-frequency elements that could muddy the mix or compete with other elements.

On the other hand, in a podcast or voiceover recording, a lower cutoff point may be used to retain some warmth in the voice while still removing any low-frequency background noise.

One important consideration when using a high pass filter is the slope or steepness of the filter.

A steeper slope will result in a more pronounced roll-off of frequencies below the cutoff point, effectively removing more low-frequency content. However, a steeper slope may also introduce phase shift or affect the overall tonal balance of the audio. It is crucial for audio engineers to listen carefully and make adjustments accordingly to achieve the desired result.

Low Pass Filter

The low pass filter is the reverse of the high pass filter. It allows frequencies below a certain cutoff point to pass through, helping to remove unwanted high-frequency content in audio productions.

Frequencies above the cutoff point are attenuated or rolled off.

Conclusion

Familiarizing oneself with the different types of equalizers discussed in this article is essential for audio engineers to optimize their workflow and achieve the desired sound.

Equalizers are essential tools in audio engineering that allow for precise control over frequencies in a sound spectrum. There are various types of equalizers, each serving specific purposes in audio production.

To learn more about equalization, listen to our various EQ examples.

EQ Ear Training for Audio Engineers: Telecaster Guitar With 12dB Boost

In this EQ Ear Training for audio engineers, we will be listening to how a 12dB boost at different frequencies affects the sound of a Telecaster Guitar.

For this listening exercise, we will be applying +12dB boost to a Telecaster Guitar. This is a chance to better understand the effect that EQ has on the sound of a Telecaster Guitar.

What is a Telecaster Guitar?

What is a Telecaster Guitar?

Let’s start with a quick explanation of what is a Telecaster Guitar?

The Telecaster guitar, affectionately known as the “Tele,” boasts a signature sound that is renowned for its unmistakable twang and clarity.

The Telecaster’s single-coil pickups capture bright and crisp tones make it an ideal choice for intricate picking and chord work. A key characteristic is its pronounced twang factor that shines through when playing clean or lightly overdriven.

EQ Ear Training: Effects of 12dB Boost on a Telecaster Guitar

For this EQ Ear Training video, we will be applying a 12dB boost to the sound of a Telecaster Guitar at different intervals.

Listen along through a set of headphones to hear how the EQ changes the characteristic of the bass. This is how EQ can be used to shape the sound of the bass.

Here are some notes on the video as you listen along. We start off with a listen through of the original bass track without any EQ. After that, there will be a 12dB boost with a Q of 3.2 applied at regular intervals.

We recommend that you try making your own notes before referring to ours.

Listening Notes

Effect of boosts at

  • 63Hz: Boomy
  • 125Hz: Makes it extra bassy
  • 250Hz: Highlights the low mids; overwhelms the high end.
  • 500Hz: Enhances the “boxy” quality of the sound.
  • 1kHz: Brings out the nasal quality of the guitar.
  • 2kHz: Brings out the high mids
  • 4kHz: Highlights the high-end frequencies.
  • 8kHz: Adds more “zing” to the top.
  • 16kHz: Less obvious.

We hope that the listening notes help you as you listen along to the video and give you a better way to relate EQ to the impact it can have on the sound of an instrument.

Each instrument is different but you can use the above as a guide when you need to make decisions about EQ.

If you liked this video, you may also wish to listen to this other one on ear training with a 9dB cut to the Jazz bass sound.

EQ Ear Training for Audio Engineers: Telecaster Guitar With 12dB Cut

In this EQ Ear Training for audio engineers, we will be listening to how a 12dB cut at different frequencies affects the sound of a Telecaster Guitar.

For this listening exercise, we will be applying +12dB cut to a Telecaster Guitar. This is a chance to better understand the effect that EQ has on the sound of a Telecaster Guitar.

What is a Telecaster Guitar?

What is a Telecaster Guitar?

Let’s start with a quick explanation of what is a Telecaster Guitar?

The Telecaster guitar, affectionately known as the “Tele,” boasts a signature sound that is renowned for its unmistakable twang and clarity.

The Telecaster’s single-coil pickups capture bright and crisp tones make it an ideal choice for intricate picking and chord work. A key characteristic is its pronounced twang factor that shines through when playing clean or lightly overdriven.

EQ Ear Training: Effects of 12dB Cut on a Telecaster Guitar

For this EQ Ear Training video, we will be applying a 12dB cut to the sound of a Telecaster Guitar at different intervals.

Listen along through a set of headphones to hear how the EQ changes the characteristic of the bass. This is how EQ can be used to shape the sound of the bass.

Here are some notes on the video as you listen along. We start off with a listen through of the original bass track without any EQ. After that, there will be a 12dB cut with a Q of 3.2 applied at regular intervals.

We recommend that you try making your own notes before referring to ours.

Listening Notes

Effect of boosts at

  • 63Hz: Little difference when the guitar is playing high notes.
  • 125Hz: Cleans up the low end
  • 250Hz: Accentuates the mids
  • 500Hz: Accentuates the lows and highs
  • 1kHz: Accentuates the low mids
  • 2kHz: Takes off the top, makes it sound a bit muted
  • 4kHz: Accentuates the lows and mids
  • 8kHz: Slightly rounds out the top
  • 16kHz: Little difference.

We hope that the listening notes help you as you listen along to the video and give you a better way to relate EQ to the impact it can have on the sound of an instrument.

Each instrument is different but you can use the above as a guide when you need to make decisions about EQ.

If you liked this video, you may also wish to listen to this other one on ear training with a 12dB boost to a Telecaster guitar sound or a 9dB cut to the Jazz bass sound.

EQ Ear Training for Audio Engineers: Jazz Bass With 9dB Cut

In this EQ Ear Training for audio engineers, we will be listening to how a 9dB cut at different frequencies affects the sound of a Jazz Bass.

For this listening exercise, we will be applying +9dB cut to a Jazz Bass. This is a chance to better understand the effect that EQ has on the sound of a Jazz Bass.

What is a Jazz Bass?

EQ Ear Training: Effects of 9dB Boost on a Jazz Bass

Let’s start with a quick explanation of what is a Jazz Bass?

The Fender Jazz Bass, often simply referred to as a Jazz Bass or J Bass, is a model of bass created by Fender Musical Instrument Corporation in 1960.

It has two single-coil pickups, one near the neck of the instrument and the other near the bridge. This makes it capable of producing a wide range of tonal options, from deep and warm to bright and snappy.

In common usage, the term Jazz Bass is used to refer to any instrument made by any manufacturer in this style.

EQ Ear Training: Effects of 9dB Cut on a Jazz Bass

For this EQ Ear Training video, we will be applying a 9dB cut to the sound of a Jazz Bass at different intervals. Listen along through a set of headphones to hear how the EQ changes the characteristic of the bass. This is how EQ can be used to shape the sound of the bass.

Here are some notes on the video as you listen along. We start off with a listen through of the original bass track without any EQ. After that, there will be a 9dB cut with a Q of 3.2 applied at regular intervals.

Listening Notes

Effect of cuts at

  • 63Hz: Reduces the weight of low end.
  • 125Hz: Less defined body.
  • 250Hz: Reduces the bass definition.
  • 500Hz: Reduces the boxiness of the bass. Brings out the low frequencies.
  • 1kHz: Mutes the high end of the bass.
  • 2kHz: Mutes the high end of the bass.
  • 4kHz: Mutes the high end of the bass.
  • 8kHz: Very little audible impact to the sound of the bass.
  • 16kHz: Very little audible impact to the sound of the bass.

We hope that the listening notes help you as you listen along to the video and give you a better way to relate EQ to the impact it can have on the sound of an instrument.

Each instrument is different but you can use the above as a guide when you need to make decisions about EQ.

If you liked this video, you may also wish to listen to this other one on ear training with a 9dB boost to the Jazz bass sound or this with a 12dB boost to a Telecaster Guitar.